Contents
Basic PrinciplesMail Classification
Navigation
Writing new messages
Replying to messages
Forwarding messages to someone else
Adding outgoing attachments and embedded images
Reading messages
Handling incoming attachments and embedded images
Printing messages
Managing your messages
Features not yet implemented in Inbox
Basic Principles
Inbox by Gmail is a completely new approach to handling and managing messages, reminders and tasks in a Gmail account using the web. To make the best use of Inbox by Gmail, you first need to forget almost everything you ever learned about Standard Gmail!Because this new webapp is not a new “skin” for the existing Standard Gmail webapp, nor is it a new interface for Gmail with the same capabilities. It’s a bottom-up alternative implementation, and is very different. It’s simple, graphic, without many bells and whistles, but with all the key features enabled - though often in a different way with a different name. Google appears to have studied all the most useful tools available out there for managing mail, and rolled them together in a brand new, easy to use interface which - eventually - will be as much at home on a tablet or a phone as on a desktop screen.
Just as in the Standard Gmail webapp, you can read and write your messages, move messages into labels, move messages out of your way that have been dealt with, keep mail you still need to attend to close at hand, delete mail you really don’t want, mark messages as Spam, create simple filters - all the basic tasks. In addition - things you can’t do in Standard Gmail - you can “snooze” a message - i.e. take it out of your inbox temporarily and have it bounce back in at a time, date or even place of your choice - and send yourself Reminders of key actions you need to perform.

The main interface for Inbox is the message list, sectioned into Today, Yesterday, This Month, and so on. Messages with attachments are listed with thumbnails, not just a paperclip icon, so it’s easier to find, Preview and download them. If a message, conversation or bundle contains multiple attachments, left and right arrows will appear, turning the thumbnails into a carousel for easy viewing and selection.

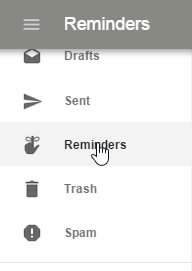
There’s a click-out Main Menu “sidebar” to the left to enable you to select various views of your mail, create new labels, and access the Settings menu and Inbox Help/Feedback. By default, this sidebar will remain on view once clicked out - but if it's in your way, you can put it away again by clicking the main menu icon again.

Your Hangouts list may initially appear on the right on startup, but can be put away till you need it by clicking the Hangouts bubble in the upper right. To toggle the list back into view, just click the Hangouts bubble again

You will also see a big red button in the lower right - hover over it to see the Compose button, along with the avatars of your most frequently used Contacts, and the button for creating Reminders.
Note: The message list is not paged - Inbox makes use of a scrolling technique which you may be familiar with if you’ve used the Gmail App on your phone. Just keep scrolling downwards…up to 250 items can be viewed like this. Though if you are looking for a particular message, always use the search box - it's far quicker than scrolling through the Inbox.
 |
| *Click the image for a larger view |
Mail classification
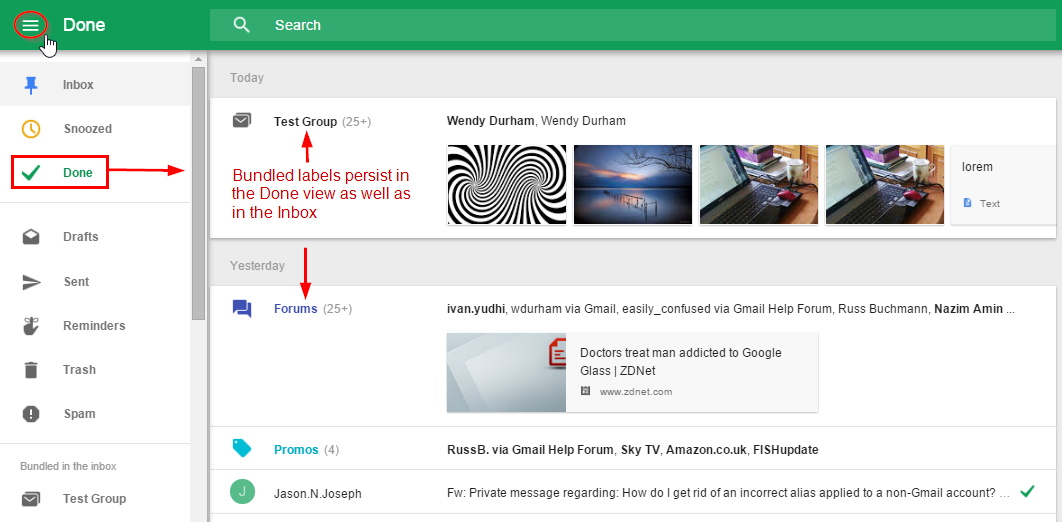
It’s time to forget read and unread, starred or not starred, Important or not Important - in Inbox , there is just a handful of types of message, which dramatically simplifies your mail handling task. Mail you have “Done” - i.e. dealt with and removed from the inbox (similar to Archive in Standard Gmail). Done messages are marked with a green check. You can see them all if you click Done in the Main Menu.
 Mail you have Pinned to deal with soon - i.e. retained in your Inbox (similar to adding a star or marking as Unread in Standard Gmail). Pinned messages are marked with a blue pin.
If you wish to see only your Pinned mail when you’re ready to catch up, you can click the slider in the upper right of the Inbox (which shows all Inbox items by default) to the Pinned position.
 Mail you have Snoozed to deal with later - which will pop back into your Inbox at the date and time you selected. View them in Snoozed in the Main Menu in the meantime.
- Drafts - you can view these by clicking Drafts in the Main Menu. To permanently delete a Draft, open it and click Discard. NB As in Gmail, a discarded Draft cannot be recovered, so exercise care when handling Drafts.

 Mail you have sent to Trash or Spam - to view them, click Trash or Spam in the Main Menu. To take messages out of Spam and Trash, you click their Pin button and have them Pinned in the inbox.


 Bundles - these are a novel feature of Inbox and a potentially very powerful tool for managing your labelled mail. They comprise system labels similar to the categories in the tabbed Inbox in Gmail, which are bundled by default (though you can unbundle them if you wish) and your own filter-applied labels which you can choose to bundle. Bundling your labelled inbox messages gives you similar functionality to a mixture of Gmail’s Tabbed Inbox, Priority Inbox, and the Multiple Inboxes Lab, all rolled up into the single Inbox inbox list.
Navigation
Before moving on to how you “do stuff” in Inbox, let’s pause briefly to focus on getting around. Whilst you can get everywhere you want to go using your mouse or trackpad to point and click, the easiest and most efficient way to get around in Inbox in a browser is with your keyboard, using the keyboard shortcuts you will see if you press Shift-?. To turn them on, click the three-bar Main Menu icon in the upper left, scroll to the bottom and choose Settings. Click “Other” to turn on the keyboard shortcuts.Most of these are the same as those used in Gmail itself, although the set is more limited. When you use the keyboard shortcuts, you need to keep your eye on the blue focus bar at the lefthand side of each message’s entry in the list - the shortcuts you press will always act on the message that has the focus.
To move the focus (the blue bar) into the Inbox message list when you start Inbox , or into a bundle you‘ve just opened, press the right arrow key, and then control its movement with the left and right arrow keys or the “j” and “k” keys.
Once you move the focus to a message, then any of the keyboard shortcuts can be used to perform actions on the message, e.g. delete (#), reply (r) or forward (f), pin (Shift-p) or mark as Done (e). And as in Gmail, “o” or “Enter” opens a message, “Esc” or “u” closes it again, and pressing “c” will open a Compose box to write a new message.
Writing new messages
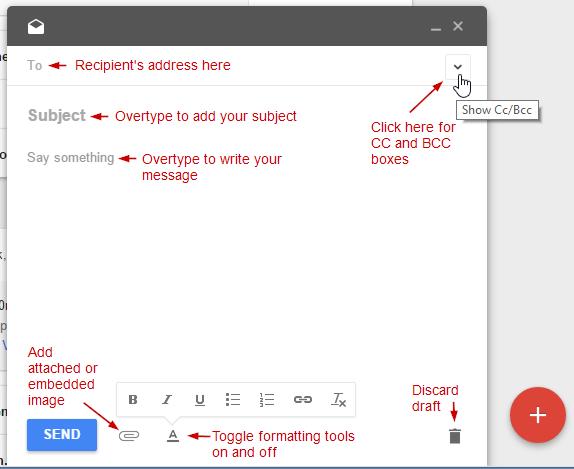
- Create a new message: hover over the big red button in the lower right, and click Compose - or just press “c” on your keyboard. A new Compose box will pop up, offering a recipient entry box, subject line and text area for your message. The bottom bar includes the Send button, the Formatting toolbar button and the attachment button, along with a discard button to permanently delete your draft if you change your mind and don’t want to send the message. (Unlike Standard Gmail, this triggers a confirmation box, so discarding drafts by mistake is less likely...!)
- To address your message: type the recipient’s address in the To: box, or if the recipient is in your Contacts, just start typing the name or address, and Inbox will use auto-complete to offer you matching entries from your Contacts. Note: your Contact Groups aren't yet supported. If you make a mistake, you can delete a recipient by clicking the “X” on the right of its “chip”. To expand the recipient box so you can add CC or BCC, click the little downward pointing arrow on the right.
- If you use Send Mail As addresses previously set up in Standard Gmail: click your own address in the From box, and pick the one you want to use.
- To type your subject: just click and type in the subject line. Then just type your message below the subject. You can set up a signature for your messages if you wish, by using Settings at the bottom of your main menu, and choosing Signatures. These are text only signatures, although you can apply simple formatting like bold or italic with keyboard shortcuts. If you have set up a signature in Settings, this does not show in your message as you type - it is added at the point of sending.
- Formatting tools: are available when you click the A in the bottom bar - most of which also have keyboard shortcuts like Ctrl-b for bold, Ctrl-i for italic and so on - and these tools also include the Add a Link button.
- Add attachments or embed images: click the paperclip to access files stored on your computer or device and upload them into your message. See the section below on Adding attachments for detailed instructions
Replying to messages
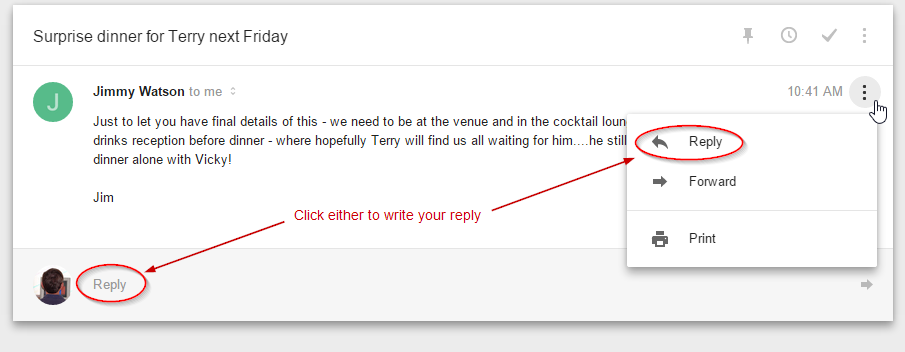

Click the Reply link next to your photo at the bottom of the message you are reading to send a Quick Reply. Or you can click the menu in the upper right of the open message (next to the datestamp) and choose to Reply from the menu. If you were the only recipient, then Reply is the default. If there were several recipients, then Reply to All is the default, but if you wish to just reply to the sender only, you’ll see a Reply arrow over to the right you can click on instead.
If you’re just going to dash off a Quick Reply, then just type your message and click Send.
Note: this will include by default the entire message you are replying to as quoted text, and the formatting toolbar isn’t available in Quick Replies, so you’ll need to apply basic formatting with keyboard shortcuts.
If you are viewing a conversation, and wish to reply to a message earlier in the thread, rather than to the most recent message, open that message, and click its menu and choose Reply.
For more options, use the pop-out icon, which will put your reply into a Compose box. In that box you can add more recipients, change your From address, change the subject to start a new conversation, and edit any quoted text, as well as just type your message. The formatting tools and the attachment button are also available. And there’s a discard button if you change your mind about your reply.
Note: Attachments to the original message are not included when you reply.
Forwarding messages to someone else
Click the Forward button on the far right, and the message will pop out automatically into a Compose box. Or you can click the menu in the upper right of the open message and choose to Forward from the menu. Here you can enter your recipient, add CC and BCC, and use all the other composing features.

Note that all the text of the forwarded message will appear automatically, with the heading of “Forwarded Message”, and all attachments will be included. If you want to delete any of the attachments, hover over them and click the little “X” in the upper right to remove them from the forwarded message. If the attachment is an image, you'll see a "three-dot" menu icon rather than an "X" that allows you to change how an image is sent, as well as remove it.

Adding outgoing attachments and embedded images
When Composing or Replying in a popped out box, to attach or embed a file stored on your computer, first click the paperclip, navigate to the folder and file you want in the file selector, then click Open. Note: There's no option as yet to Insert from Drive.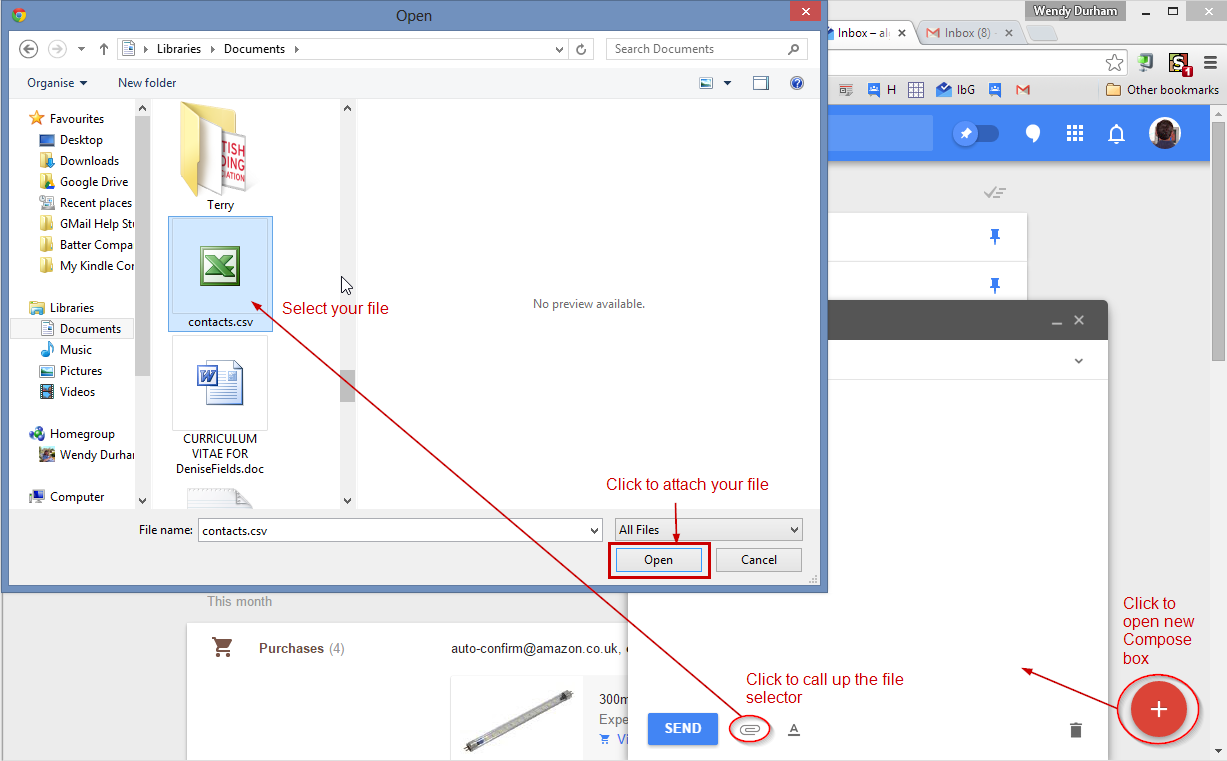 |
| *click the image for a larger view |
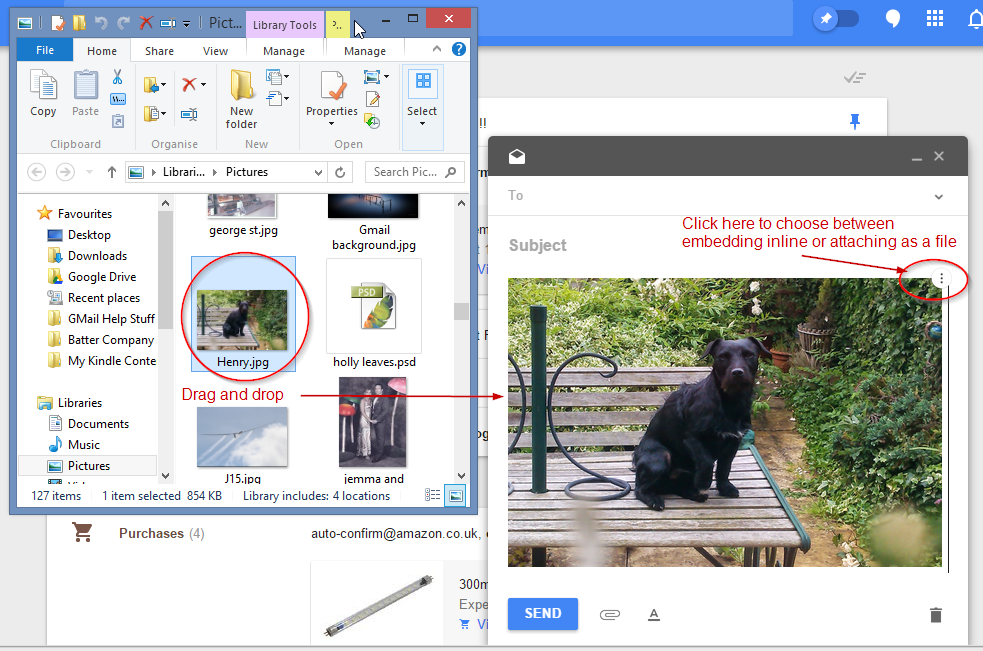
You can also drag and drop files right from your computer folders into the message box.
If you select or drag a single image file, the image will be embedded in the message by default - if you’d prefer it to go as an attachment, click the menu icon in the top right corner of the photo and choose Send as Attachment. The embedded picture will then collapse to an attachment thumbnail at the bottom of the message box.


There’s no tool to change the display size of an embedded image in your message box - embedded images display at “best fit” by default, though the full sized file is always included in the message.
If you select multiple image files in the file selector, or drag more than one image file, then the images will be uploaded as attached files by default - but again, you can use the menu in the top right corner of each thumbnail to change them to inline images after they’ve been uploaded. The thumbnails will then expand into images within the message area.
Other types of file are always attached, whether you use the file selector or drag and drop, and always show as attachment thumbnails at the bottom of the message box.
The menu icon in the upper right corner of each embedded image or attachment thumbnail also has a Remove option if you’ve made a mistake or changed your mind.
Reading messages
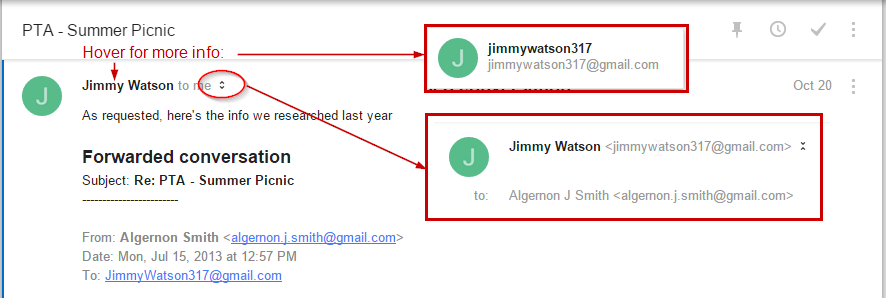
To read any message or conversation in your inbox or a label, click it - or use “o” or Enter on the keyboard.You can display abbreviated header information by clicking the little double headed arrow next to the sender's name, or see brief sender information by hovering over the sender's name.
Conversations are displayed similarly to Standard Gmail - earliest message at the top, and the newest at the bottom with all previously read messages in the conversation collapsed out of the way.
To re-read earlier messages in a conversation, click the circular numbered button over the collapsed message line to re-expand them.

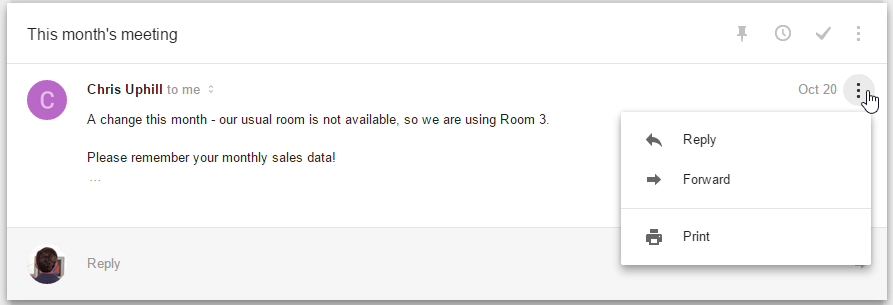
Each individual message has its own menu in the upper right, allowing you to select whether to Reply, Forward or Print.
Each message or conversation also has a subject bar menu, allowing the conversation to be labelled or have a label removed or changed to another, or sent to Spam or Trash. You can also create a new label using this menu.

To close a message or conversation you are reading, click its title bar, which will have "stuck" at the top of your window for easy access. Or you can press Esc or "u" on your keyboard.
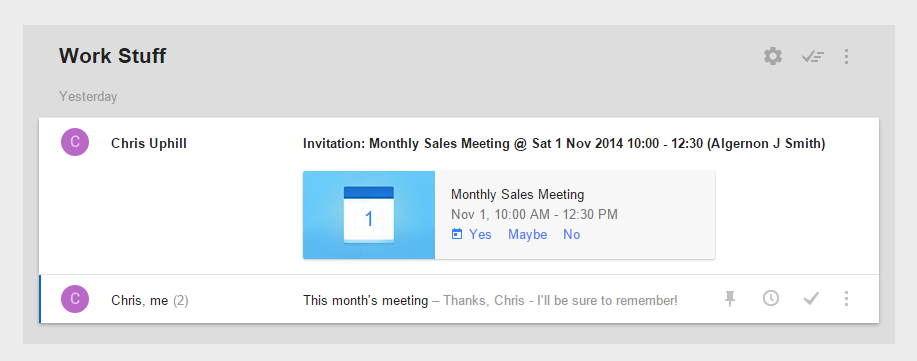
Messages and conversations which are in Bundles work in a similar way, but you need to open the Bundle first by clicking on it. Bundles open within a grey tinted background box to distinguish them from unbundled Inbox messages and conversations.
To close a Bundle again, click its title bar, which will have "stuck" at the top of your window for easy access. Or you can use the keyboard shortcuts.
Handling incoming attachments and embedded images
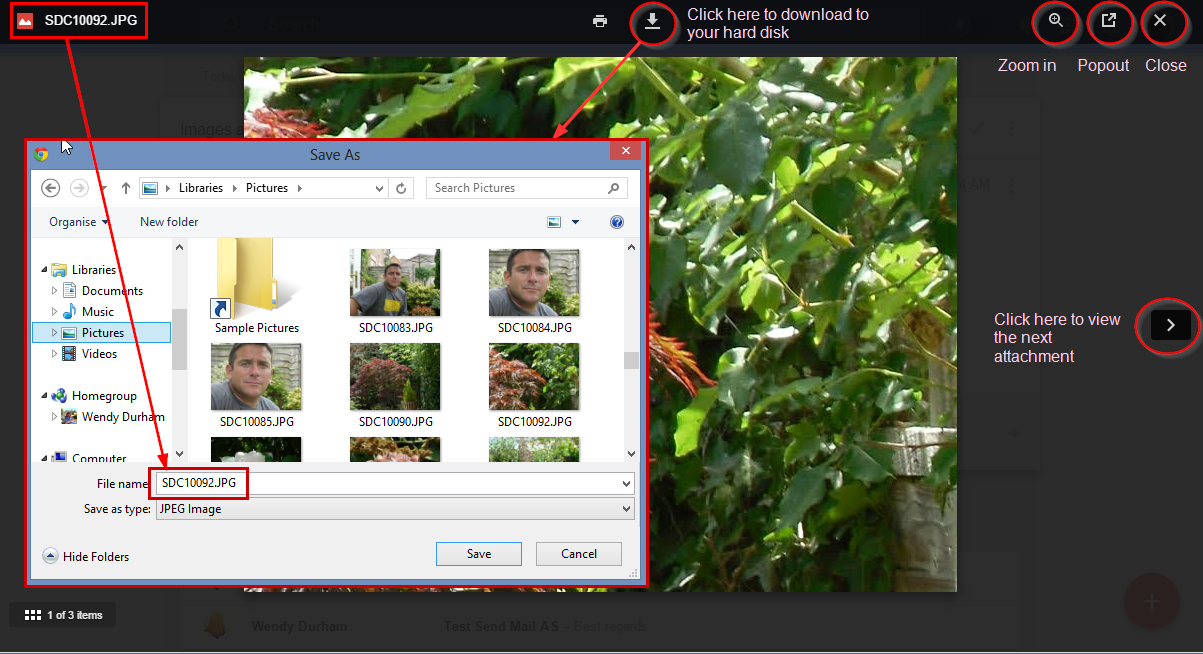
In Inbox, if a message, conversation or bundle contains attachments, you’ll see them right in your inbox list, as well as at the bottom of the relevant message when you open it. To Preview them in the viewer, click the attachment thumbnails, either in your inbox or in the open message. To Preview multiple attachments, use the righthand and lefthand arrows in the viewer to cycle through them. You can also print from within the Preview window, and pop-out the Preview into a new tab by clicking the pop-out arrow.To download an attachment to your computer, click the thumbnail, and then choose the Download button from the options at the top of the Preview window. Note: There's no option as yet to Save to Drive
 |
| *click the image for a larger view |
If Chrome is set to always ask you where to download an attachment, a file selector will appear for you to choose the destination folder on your computer. If Chrome is not set to ask you, the attachment will download automatically to your default Download folder. If Chrome is set to always open a specific type of file with a specific program, then it will always auto-download and open in the program you chose.
Embedded images can behave in two ways, depending on their source. If the message has been sent to you by another Inbox user, you will be able to Preview the image by clicking it, and then download it from the Preview window. If it has been sent by another other webapp, client or service, then you might not be able to Preview it - in that case, to download it, right-click the image and choose “Save As…” from the context menu.
Printing Messages
When you open a message, you'll see a small menu in the upper right, next to the message timestamp, which lists various options including Print. Select Print to print the message.
Note: there are no tools to print a whole conversation
Managing your messages
When you hover over a message, conversation or bundled label in your Inbox, you will see a collection of appropriate action icons appear. Those that are greyed out are not in force (inactive) - those that are coloured have been applied to the message (active)..

Message actions include by default buttons to Pin, Snooze, mark as Done, or Move a message or conversation. You can, if you wish, use Settings >> Other to replace the Done marker with a Trash icon, but this option needs using with care.

Bundle actions will display a Settings button, a Sweep to Done or Trash

Pinning messages and conversations: Pinning a message retains it in your Inbox for future action. To Pin a message click the grey (inactive) pin icon next to the message subject in your Inbox to turn it blue (active). (You could roughly translate this to starring a message or marking it as unread in Standard Gmail, although there is no direct equivalence.)
If the pinned message or conversation is in a bundle, it will appear both in its bundle and separately in the Inbox. (This works in a similar way to starring a message in the tabbed inbox in Standard Gmail, so that it also shows up in the Primary tab.)
To unpin a message once it has been dealt with, click the blue Pinned icon to toggle it back to grey (inactive) again.
 To see just your pinned messages in your Inbox, use the Pin slider in the top bar to toggle the display from All Items to Pinned Only (and back again!).
 Marking messages and conversations as Done: When you are done with a message or a conversation in your Inbox list, and have read and acted on it, you can move it out of your Inbox by marking it Done. Click the checkmark to toggle the Done marker from grey (off) to green (active).
You can do the same with messages and conversations within a bundle. Once they are marked done, they will move out of the bundle in the inbox, and into that bundle in the Done list.
Note: If you have chosen the option in Settings >> Other to replace the Done button in the action bar with a Trash button, then to mark a message or bundle as Done, you will need to use the Move To menu and choose Done from the dropdown.
The Done list, accessible from the Main Menu, is organised into messages, conversations and bundles in a similar way to your Inbox. However, unlike your Inbox, Done is listed in the order that messages, conversations and bundles were marked as Done, rather than by the timestamp on the message itself. So mail or bundles you have just marked as Done will be at the top of the Done list and therefore easy to find. This also provides a useful aide-memoire if you need to find out when you dealt with a specific message and marked it as Done.
Note: To see Done in message time/datestamp order rather than Done order, you can do a simple search for "is:done" using the search box.
 Using bundles: Bundles are what their name implies - bundles of messages in your Inbox which are linked together by their label, so that they appear as a single item in your Inbox listing. Bundles appear in your list based on the date and time of the most recent message in the bundle. To read the conversations in a bundle, simply click on the bundle title - or if you’re using keyboard shortcuts, move the focus bar into the bundle and press “o” or Enter. When you are done reading, click the bundle title again to collapse it out of your way - or press Esc.
To mark a bundled message as Done if you’ve no further need for it, click its Done icon and it will move out of the bundle.
If you need to come back to a message, and want it to stay prominent in your Inbox, you can Pin it, to also list it in the main Inbox as well as in its bundle.
If you’ve read all the messages in a bundle, and pinned those you need to hang on to in your Inbox for a while, you can then “Sweep” the rest of the bundle out of the way by clicking the sweep icon at the top right. All unpinned messages will be marked Done, and the bundle will disappear from your Inbox list until the next message with the appropriate label arrives. In the meantime you can view it in the Done label.
Note: Bundles are a little like Tabs in Standard Gmail - they only contain mail that is in your Inbox. So if you mark everything in a bundle as Done, or Pin it out of its bundle to the Inbox, then you won’t see the bundle in your Inbox. But you can still see all the messages that have that label, by clicking the label in the Main Menu or looking for the same bundle in the Done label.
The only labels that can be bundled are those that have been auto-applied by one of your filters or by a system scan. The system labels - Forums, Social, Purchases, Travel etc - are automatically bundled for you - though you can turn that off in Main Menu >> Settings - and you can use the same settings box to choose which of your own existing labels applied by a filter are bundled. Note: Labels you always apply manually can’t be bundled, so if you want to create a new bundle from one of those labels, first create a filter….
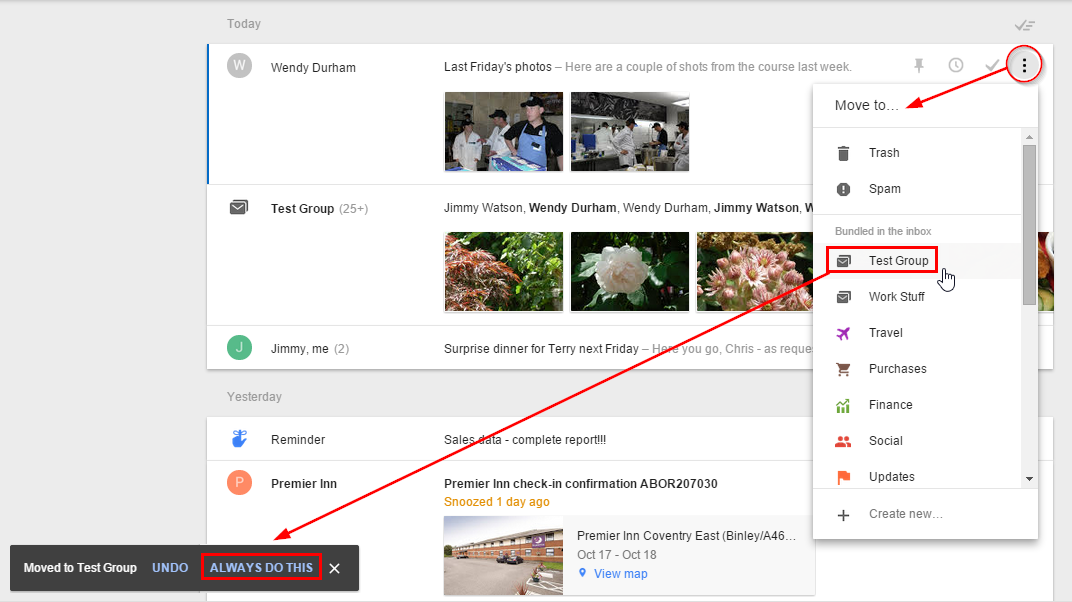
Making filters: Simple filters - e.g. labelling incoming messages by sender - can be done directly from the message list. Hover over a message from the sender you want to filter and choose the three-dot Move-To icon. Select the label you want to be applied. A box will pop up in the lower left asking if you want to “Always do this” (i.e. always have that sender’s message given the label) - click Confirm. Inbox will create a new filter for that sender, and automatically create a new Inbox bundle for the label. (You can unbundle the label if you wish - then you would view mail with that label by clicking the label in the label list as usual.)
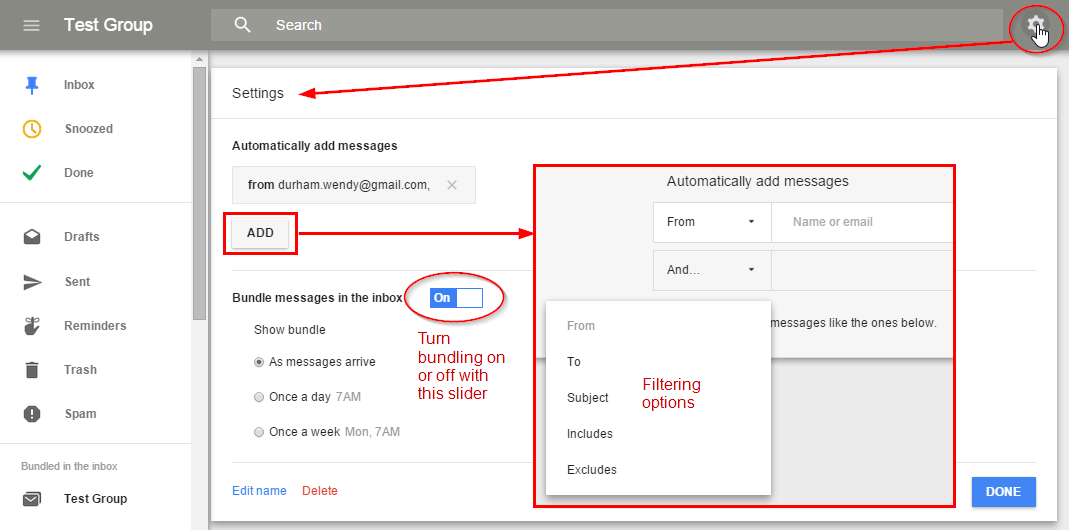
More complex labelling filters can be created if you open the Main Menu and click the label you want to work with, and then click its gear icon to get to its settings. Pick Add and choose your message selection criteria from the dropdown menus - From, To, Subject, Includes, Doesn’t Include are all available.
Filters which have other actions than applying a label - i.e. sending to Trash or changing a category assignment - can be created in Standard Gmail, and will be reflected in Inbox.
Applying labels manually: For the labels you don’t need to be bundled, you apply them normally by hand, using the Move To icon that appears when you hover over any message/conversation. Pick the label you want them moved to from the dropdown menu that will appear - they will then be labelled, marked as Done and removed from your Inbox. (If you don’t want them removed from the Inbox, Pin them first!) Messages labelled in this way will always be visible:

 Sending mail to Spam and Trash: You also use the Move To menu to mark messages as Spam if the Spam filter has missed them, or to delete messages by sending them to Trash. If you chose the option in Settings >> Other to replace the Done button with a Trash icon, you can also click that icon in the action bar.
If you want to send several messages to Trash, select them by clicking on their avatars and then choose the Trash button from the blue Select bar that will appear at the top of the page.
Messages you need to move out of Trash or Spam should be Pinned to return them to the Inbox.
There’s no Empty Spam or Empty Trash command, and no Delete Forever command for individual messages - but Inbox auto-deletes Trash and Spam on a rolling 30 day basis like Standard Gmail, so there’s no unwieldy buildup of unwanted mail in your account.
 Sweeping: Sweeping is an ideal way to mark a whole bunch of messages and conversations as Done, and get them out of your way. The Sweep button is available for bundled labels when you hover over them or open them and is a visible button at the top of all the individual days and months in your list. Note: if you have chosen the option in Settings >> Other to replace the Done button with a Trash button, sweeping will sweep to Trash, so use this option with great care.
To use Sweep, first look through your mail, Pin anything you want to keep by you in your Inbox and Snooze anything you want to pop back later. Then just Sweep - and away go all the messages you’ve read, dealt with or don’t need to keep alive in your Inbox. If you’ve swept a bundle, the bundle itself will temporarily disappear from your Inbox into Done too, until the next new message for that bundle arrives.
If you make an error and sweep a bundle by mistake, use the Undo link that will pop up in the lower left, OR you can switch to Done using the Main Menu, select the bundle by clicking its icon, and click the green Done marker that will appear in the top bar to return it to the Inbox.
If you want to review your “sweepings” later, just click Done in the Main Menu to see them all - the most recently marked will be at the top of the list.
 Snoozing: We’ve all been there - in comes a message, and you really don’t want to deal with it just yet. Perhaps you don’t have time right now, perhaps you are waiting for some info to come in that will help with your reply, but for whatever reason you want to put off dealing with it till tomorrow or next week or even next month. Enter Snooze….
Hover over your message in the message list, and click the Snooze button. Pick the day when you will be ready to deal with it - there’s a calendar dropdown if you want to pick a very specific time and date - and hit Save. At the due date and time, the message will pop back to the top of your Inbox list, ready for you to deal with it. Just like Boomerang!
To see messages you have Snoozed, pick Snoozed from the main menu.
 Using reminders: These are a great alternative to Tasks in Standard Gmail. To create a reminder, hover over the big red button in the lower right and choose Reminder - or you can use the keyboard shortcut “t”. In the text box that pops up, enter the task you want to be reminded about, and click Save. Before clicking Save, you can pin your new reminder so it will show in your inbox list, and you can Snooze a Reminder to have it pop up at a more appropriate future time or on a specific due date
If you have Pinned a message or conversation to your Inbox, you will also find a “Remember to….” link at the top of that message/convo when you open it, as a quick way to create a reminder linked to that Pinned item. (This is a little like creating a Task from an email message in Standard Gmail.)
To see all your current Reminders you can click Reminders in the Main Menu. This provides a complete Task list of all the things you have to do.
 Combining Snooze and Reminder: You can build an even better Task list in Inbox by creating reminders for things you have to do, and then Snoozing the reminders until closer to their due date. The reminder will then pop back into your Inbox on the date you chose. To see your "Task" list, just click Reminders in the main menu, and the Snooze date will be shown on the right. You can also click Snoozed in the main menu to see all the messages and reminders you have snoozed.You can also easily add a reminder about specific required actions - and Snooze or not as needed - to any message or conversation you have Pinned. Click the Pinned message, and you will see the "Remember to...." box right above it to add your reminder. To Snooze the reminder, along with its message or conversation, then click the Snooze icon in the conversation header.
Searching: Just like in Standard Gmail, you can use the search box to find your mail, old and new, by entering and combining standard search terms. Search by sender, by label, by content, by subject, by category, by date - or combine any number of queries to find just the messages you want.
You can find the full list of Gmail's search terms here: https://support.google.com/mail/answer/7190
Features not yet implemented: There are a number of Standard Gmail features that aren't yet implemented in Inbox by Gmail - and given the differences between this new app and Standard Gmail, some of them may never surface, as they aren't relevant to the Inbox by Gmail use model. Here are some features and tools that experienced Standard Gmail power-users might miss in Inbox and what you can do about it:
* Gmail and Inbox by Gmail are trademarks of Google, Inc. This page is not sponsored by or affiliated with Google.
(depending on the option you chose in Settings >> Other) button
and a Move menu.
Collections of messages under Today, Yesterday, etc will also show a Sweep button.
If the pinned message or conversation is in a bundle, it will appear both in its bundle and separately in the Inbox. (This works in a similar way to starring a message in the tabbed inbox in Standard Gmail, so that it also shows up in the Primary tab.)
To unpin a message once it has been dealt with, click the blue Pinned icon to toggle it back to grey (inactive) again.
You can do the same with messages and conversations within a bundle. Once they are marked done, they will move out of the bundle in the inbox, and into that bundle in the Done list.
Note: If you have chosen the option in Settings >> Other to replace the Done button in the action bar with a Trash button, then to mark a message or bundle as Done, you will need to use the Move To menu and choose Done from the dropdown.
The Done list, accessible from the Main Menu, is organised into messages, conversations and bundles in a similar way to your Inbox. However, unlike your Inbox, Done is listed in the order that messages, conversations and bundles were marked as Done, rather than by the timestamp on the message itself. So mail or bundles you have just marked as Done will be at the top of the Done list and therefore easy to find. This also provides a useful aide-memoire if you need to find out when you dealt with a specific message and marked it as Done.
Note: To see Done in message time/datestamp order rather than Done order, you can do a simple search for "is:done" using the search box.
To mark a bundled message as Done if you’ve no further need for it, click its Done icon and it will move out of the bundle.
If you need to come back to a message, and want it to stay prominent in your Inbox, you can Pin it, to also list it in the main Inbox as well as in its bundle.
If you’ve read all the messages in a bundle, and pinned those you need to hang on to in your Inbox for a while, you can then “Sweep” the rest of the bundle out of the way by clicking the sweep icon at the top right. All unpinned messages will be marked Done, and the bundle will disappear from your Inbox list until the next message with the appropriate label arrives. In the meantime you can view it in the Done label.
Note: Bundles are a little like Tabs in Standard Gmail - they only contain mail that is in your Inbox. So if you mark everything in a bundle as Done, or Pin it out of its bundle to the Inbox, then you won’t see the bundle in your Inbox. But you can still see all the messages that have that label, by clicking the label in the Main Menu or looking for the same bundle in the Done label.
The only labels that can be bundled are those that have been auto-applied by one of your filters or by a system scan. The system labels - Forums, Social, Purchases, Travel etc - are automatically bundled for you - though you can turn that off in Main Menu >> Settings - and you can use the same settings box to choose which of your own existing labels applied by a filter are bundled. Note: Labels you always apply manually can’t be bundled, so if you want to create a new bundle from one of those labels, first create a filter….
Making filters: Simple filters - e.g. labelling incoming messages by sender - can be done directly from the message list. Hover over a message from the sender you want to filter and choose the three-dot Move-To icon. Select the label you want to be applied. A box will pop up in the lower left asking if you want to “Always do this” (i.e. always have that sender’s message given the label) - click Confirm. Inbox will create a new filter for that sender, and automatically create a new Inbox bundle for the label. (You can unbundle the label if you wish - then you would view mail with that label by clicking the label in the label list as usual.)
More complex labelling filters can be created if you open the Main Menu and click the label you want to work with, and then click its gear icon to get to its settings. Pick Add and choose your message selection criteria from the dropdown menus - From, To, Subject, Includes, Doesn’t Include are all available.
Filters which have other actions than applying a label - i.e. sending to Trash or changing a category assignment - can be created in Standard Gmail, and will be reflected in Inbox.
Applying labels manually: For the labels you don’t need to be bundled, you apply them normally by hand, using the Move To icon that appears when you hover over any message/conversation. Pick the label you want them moved to from the dropdown menu that will appear - they will then be labelled, marked as Done and removed from your Inbox. (If you don’t want them removed from the Inbox, Pin them first!) Messages labelled in this way will always be visible:
- when you click the relevant label in the Main Menu. Here you can click Move To again to change the label to a different one, or remove the label altogether if you wish.
- when you click Done. Here you can click Move To again to apply a second label to the message. You can also undo the Done checkmark by clicking it to return the message to the Inbox if you wish.
Sending mail to Spam and Trash: You also use the Move To menu to mark messages as Spam if the Spam filter has missed them, or to delete messages by sending them to Trash. If you chose the option in Settings >> Other to replace the Done button with a Trash icon, you can also click that icon in the action bar.If you want to send several messages to Trash, select them by clicking on their avatars and then choose the Trash button from the blue Select bar that will appear at the top of the page.
Messages you need to move out of Trash or Spam should be Pinned to return them to the Inbox.
There’s no Empty Spam or Empty Trash command, and no Delete Forever command for individual messages - but Inbox auto-deletes Trash and Spam on a rolling 30 day basis like Standard Gmail, so there’s no unwieldy buildup of unwanted mail in your account.
Sweeping: Sweeping is an ideal way to mark a whole bunch of messages and conversations as Done, and get them out of your way. The Sweep button is available for bundled labels when you hover over them or open them and is a visible button at the top of all the individual days and months in your list. Note: if you have chosen the option in Settings >> Other to replace the Done button with a Trash button, sweeping will sweep to Trash, so use this option with great care.To use Sweep, first look through your mail, Pin anything you want to keep by you in your Inbox and Snooze anything you want to pop back later. Then just Sweep - and away go all the messages you’ve read, dealt with or don’t need to keep alive in your Inbox. If you’ve swept a bundle, the bundle itself will temporarily disappear from your Inbox into Done too, until the next new message for that bundle arrives.
If you make an error and sweep a bundle by mistake, use the Undo link that will pop up in the lower left, OR you can switch to Done using the Main Menu, select the bundle by clicking its icon, and click the green Done marker that will appear in the top bar to return it to the Inbox.
If you want to review your “sweepings” later, just click Done in the Main Menu to see them all - the most recently marked will be at the top of the list.
Snoozing: We’ve all been there - in comes a message, and you really don’t want to deal with it just yet. Perhaps you don’t have time right now, perhaps you are waiting for some info to come in that will help with your reply, but for whatever reason you want to put off dealing with it till tomorrow or next week or even next month. Enter Snooze….Hover over your message in the message list, and click the Snooze button. Pick the day when you will be ready to deal with it - there’s a calendar dropdown if you want to pick a very specific time and date - and hit Save. At the due date and time, the message will pop back to the top of your Inbox list, ready for you to deal with it. Just like Boomerang!
To see messages you have Snoozed, pick Snoozed from the main menu.
Using reminders: These are a great alternative to Tasks in Standard Gmail. To create a reminder, hover over the big red button in the lower right and choose Reminder - or you can use the keyboard shortcut “t”. In the text box that pops up, enter the task you want to be reminded about, and click Save. Before clicking Save, you can pin your new reminder so it will show in your inbox list, and you can Snooze a Reminder to have it pop up at a more appropriate future time or on a specific due date If you have Pinned a message or conversation to your Inbox, you will also find a “Remember to….” link at the top of that message/convo when you open it, as a quick way to create a reminder linked to that Pinned item. (This is a little like creating a Task from an email message in Standard Gmail.)
To see all your current Reminders you can click Reminders in the Main Menu. This provides a complete Task list of all the things you have to do.
Combining Snooze and Reminder: You can build an even better Task list in Inbox by creating reminders for things you have to do, and then Snoozing the reminders until closer to their due date. The reminder will then pop back into your Inbox on the date you chose. To see your "Task" list, just click Reminders in the main menu, and the Snooze date will be shown on the right. You can also click Snoozed in the main menu to see all the messages and reminders you have snoozed.You can also easily add a reminder about specific required actions - and Snooze or not as needed - to any message or conversation you have Pinned. Click the Pinned message, and you will see the "Remember to...." box right above it to add your reminder. To Snooze the reminder, along with its message or conversation, then click the Snooze icon in the conversation header.Searching: Just like in Standard Gmail, you can use the search box to find your mail, old and new, by entering and combining standard search terms. Search by sender, by label, by content, by subject, by category, by date - or combine any number of queries to find just the messages you want.
You can find the full list of Gmail's search terms here: https://support.google.com/mail/answer/7190
Features not yet implemented: There are a number of Standard Gmail features that aren't yet implemented in Inbox by Gmail - and given the differences between this new app and Standard Gmail, some of them may never surface, as they aren't relevant to the Inbox by Gmail use model. Here are some features and tools that experienced Standard Gmail power-users might miss in Inbox and what you can do about it:
- Create complex filters - create these in Standard Gmail. The results will show in Inbox
- Empty Trash and Spam - do this in Standard Gmail if you feel it is essential and don't want to wait on the 30-day auto-delete cycle
- Multiple message selection - The Sweep button in Inbox meets bulk archiving requirements, but if you need multiple selection tools - such as Select All, or Select Unread, etc - for other purposes, sign into Standard Gmail to use them.
- Labs - Gmail’s Labs don’t work with Inbox.
- Spellcheck - there’s no spellcheck in Inbox, so set up the spellchecker supplied by your browser to suit your usage - these are usually far more effective than the Standard Gmail offering in any case!
- Conversation view - can’t be turned off - it’s integral to the webapp. If you want to operate without CV, then you will need to continue using Standard Gmail.
- Larger compose tabs or windows - aren’t available in Inbox. If they are essential to your usage, then you will need to continue with Standard Gmail.
- Automated signatures with formatting and images won’t carry over from Gmail - but a text only signature with basic formatting such as bold or italic can be set up in Settings >> Signatures.
- Cross-platform availability - Inbox by Gmail is initially only available for the Chrome v38+ browser on computers, and for Android phones running 4.1 (Jellybean) and above and iPhones running iOS7 and above. Initially, only Gmail accounts are supported.
For more information:
- The Inbox by Gmail Help Centre is here: https://support.google.com/inbox/?hl=en#
- Find the Inbox by Gmail Help Forum here: https://productforums.google.com/forum/?nomobile=true#!forum/inbox
- Compare and contrast Standard Gmail with Inbox by Gmail here: http://gmail-tips.blogspot.com/2014/10/inbox-by-gmail.html
- For a quick overview, see the official Gmail Blog here: http://gmailblog.blogspot.co.uk/2014/10/an-inbox-that-works-for-you.html and http://gmailblog.blogspot.co.uk/2015/05/thanks-to-you-inbox-by-gmail-is-now.html